The braking system is undoubtedly the most critical safety component of any vehicle. In Puerto Rico, driving conditions—characterized by high temperatures, saline humidity, and a topography that demands constant braking in mountainous areas—accelerate the wear of friction components. Learning how to change your car brakes not only represents significant savings for the family budget but also gives the driver total control over the quality of the parts installed in their vehicle.
In this exhaustive guide from Centropiezas Plus, we break down every aspect of the disc brake system, from basic physics to professional-level tips that guarantee quiet and powerful braking. If you are ready to become your own mechanic, you’ve come to the right place.
Understanding the System: How Do Disc Brakes Actually Work?
To perform effective maintenance, we must first understand what happens when you press the pedal. Most modern cars on the island use a hydraulic disc brake system. When you step on the brake, hydraulic fluid pushes a piston in the caliper, which in turn presses the brake pads against the rotor (disc). This friction converts kinetic energy into heat, stopping the vehicle.
In-Depth Diagnosis: Signs Your Brakes Need a Change
Before starting the physical work, use this diagnostic table to identify which components are actually failing:
Brake Problem Diagnostic Guide
Symptom | Possible Cause | Recommended Action |
High-pitched squeal when braking | Worn pads (wear indicator touching the rotor) | Immediate pad replacement. |
Metal-on-metal grinding sound | Pads completely exhausted | Replace pads and inspect rotors. |
Steering wheel vibration | Warped or heat-damaged rotors | Resurface or replace rotors. |
“Spongy” or soft pedal | Air in the system or low fluid | Bleed the brakes and check for leaks. |
Burning smell after braking | Stuck caliper or adjusted handbrake | Inspect calipers and lubricate. |
Making the Right Choice: Brake Pad Types in 2026
At Centropiezas Plus, we offer options for every budget and need. Use this comparison to choose the best fit for your driving style in Puerto Rico:
Brake Pad Material Comparison
Material Type | Durability | Dust Generation | Heat Performance | Recommendation |
Organic | Low | High | Moderate | Gentle city driving. |
Semi-Metallic | High | High | Excellent | Heavy loads and steep hills. |
Ceramic | Very High | Very Low | Superior | Best overall choice. |
Brake Fluid Specifications (DOT)
A common mistake when changing brakes is mixing incompatible fluids. Always consult your car manual or the reservoir cap.
Brake Fluid Classification
Type | Boiling Point (Dry) | Chemical Base | Compatibility |
DOT 3 | 401°F (205°C) | Glycol | Conventional and older cars. |
DOT 4 | 446°F (230°C) | Glycol | Modern cars and SUVs (Very common). |
DOT 5 | 500°F (260°C) | Silicone | DO NOT mix with DOT 3 or 4. |
DOT 5.1 | 518°F (270°C) | Glycol | High performance / ABS Systems. |
Essential Tools: Your Centropiezas Plus “DIY Kit”
Do not improvise with household tools. The braking system requires precision. Here is the list of what you should have ready in your garage:
Tools and Materials Checklist
Tool | Process Use | Available at Centropiezas Plus? |
Floor Jack | Lifting the vehicle stably. | Yes, available in tools section. |
Jack Stands | Safety support (Mandatory). | Yes, various capacities. |
C-Clamp / Compressor | Retracting the caliper piston. | Yes, specialized tools. |
Brake Fluid | Topping off the hydraulic system. | Yes, all DOT specifications. |
Brake Cleaner | Cleaning grease and carbon residue. | Yes, in the chemicals section. |
Brake Grease | Lubricating pins and contact points. | Yes, high-temp packets and tubs. |
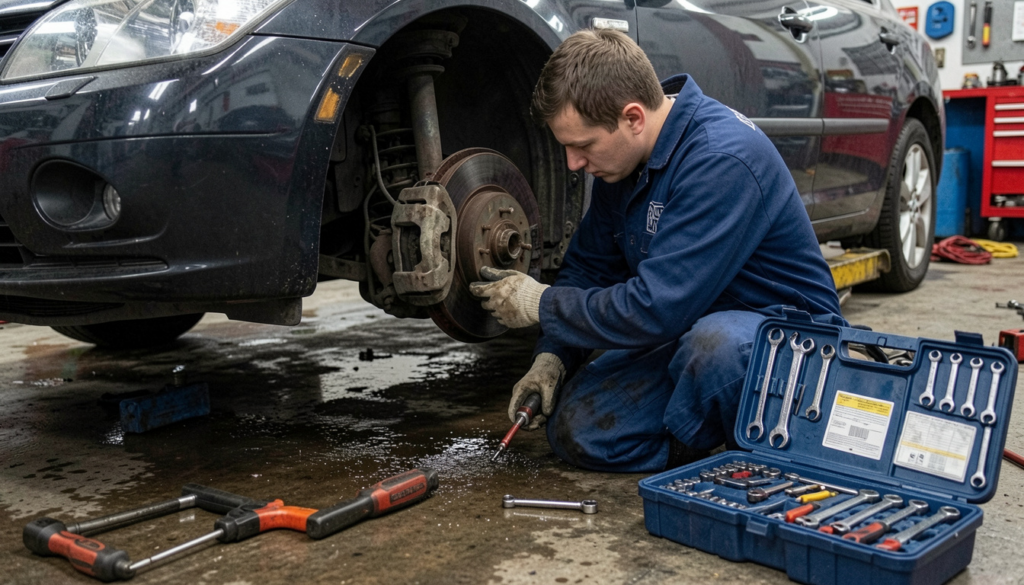
Step-by-Step Guide: Successfully Changing Your Brakes
Step 1: Safety and Access
Park on a flat surface. Loosen the lug nuts (do not remove them) before jacking up the car. Place the jack stands at the chassis points indicated by the car manual.
Step 2: Caliper Removal
Identify the two bolts at the back of the caliper. Once removed, carefully slide the caliper off. Critical Point: Use a bungee cord or wire to hang the caliper from the suspension. If you let it hang by the rubber brake hose, the weight can cause an invisible internal tear that will lead to future failure.
Step 3: Inspection and Cleaning
Remove the old pads and observe the rotor. If you see deep grooves or blue spots (heat spots), the rotor is compromised. Use brake cleaner generously over the entire metal surface to remove any film or debris.
Step 4: Piston Retraction
Open the brake fluid reservoir under the hood (this releases pressure). Place an old brake pad in front of the piston and use the C-Clamp to press it back slowly until it is flush with the caliper body.
Step 5: Lubrication and Installation
Install the new hardware (metal clips) that came in your Centropiezas Plus box. Apply brake grease to the points where the pad touches the caliper (never on the friction material or the rotor). Slide the new pads into place.
Step 6: Reassembly and Pumping
Slide the caliper back over the pads and tighten the bolts. Reinstall the wheel. Before moving the car, pump the brake pedal 5 to 10 times. The pedal will feel loose at first; this is normal while the piston adjusts to the new pad thickness.
The “Bedding-In” Process: A Professional Secret
Many people install new brakes and immediately drive at high speeds. This is a mistake. For pads to last, they must undergo a “seating” or bedding-in process.
- Drive at 30 mph and brake gently down to 5 mph. Repeat 5 times.
- Drive at 45 mph and brake firmly (without locking the wheels) down to 10 mph. Repeat 5 times.
- Allow the brakes to cool by driving for 10 minutes without heavy braking.
This transfers a microscopic layer of pad material to the rotor, preventing future noise and vibration.
Common Mistakes to Avoid
- Not checking fluid levels: If the reservoir overflows when compressing the piston, the fluid can damage the engine paint.
- Installing pads backward: Some pads have internal and external positions. Check the markings (Inner/Outer).
- Forgetting to clean new rotors: New rotors come with a protective oil coating to prevent rust. If you don’t clean them with Brake Cleaner, you will contaminate the new pads instantly.
Why Trust Centropiezas Plus for Your Brakes?
In Puerto Rico, we are leaders because we know our market. We don’t just sell parts; we offer solutions adapted to the reality of the Puerto Rican driver.
- Local Warranty: If something fails, we are near you with more than 50 locations.
- Prestigious Brands: We work with manufacturers that supply Original Equipment Manufacturers (OEM).
- Smart Search: On our website, enter your license plate number, and we will give you the exact part that fits your year and model.
Empowerment and Road Safety
Changing your own brakes is one of the most rewarding experiences in the automotive world. You don’t just save money; you ensure the work was done with patience and attention to detail. With this guide and the parts from Centropiezas Plus, your car is ready for any road trip around the island.
Need parts right now?